

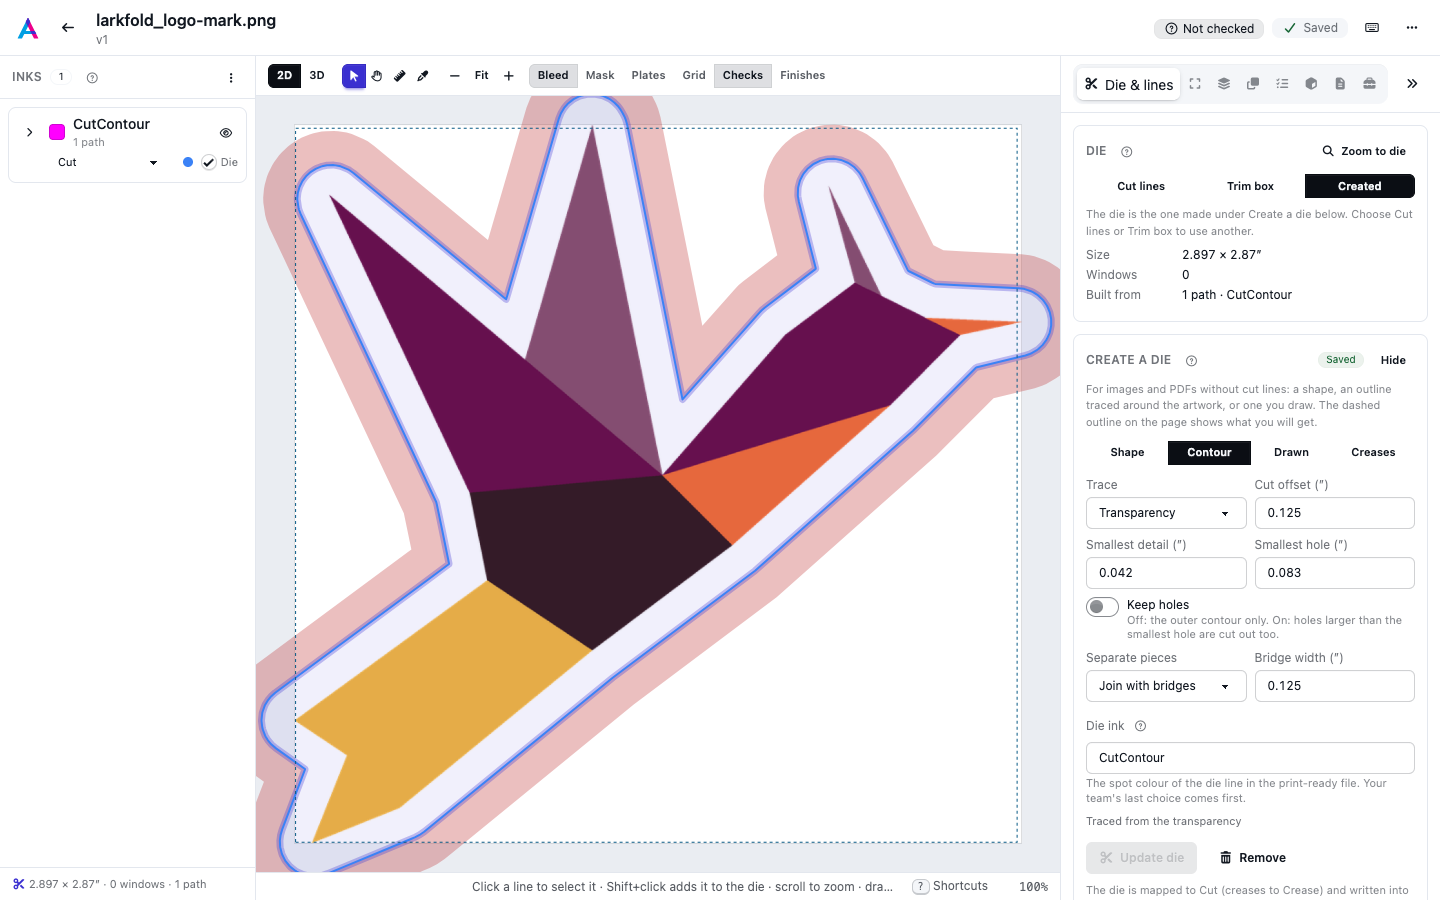
An image has no cut lines, and many PDFs arrive without any. For a file from Files, the Die & lines tab has a Create a die section: make the die from a shape, trace it around the artwork, or draw it on the page, and add crease lines. The die you create is used like any other: for the nest, the cut file, the bleed and the 3D fold.
Four ways to make it#
The buttons at the top of the section choose how the die is made. While you change a setting, a dashed outline on the page shows the die you will get; nothing is saved until you press Create die (Update die once there is one).
| Choice | Best for |
|---|---|
| Shape | Cards, labels and tags cut as a rectangle, a rounded rectangle or an ellipse. |
| Contour | Die-cut stickers and labels that follow the artwork's outline. |
| Drawn | Any other outline, drawn point by point on the page. |
| Creases | Crease and extra cut lines added to the die you made with one of the other three. |
Shape#
| Shape | What it cuts |
|---|---|
| Rectangle | Square corners: cards, flyers, square labels. |
| Rounded rectangle | Round corners of the corner radius you type: business cards, tags, rounded labels. |
| Ellipse | An oval, or a circle on a square page: round stickers and lids. |
Choose The trim box as the Size to cut the page's trim, or Custom size and type a Width and Height: the shape stays centred on the page. Offset moves the cut out (a positive number) or in (a negative one); for example −3 mm cuts a 3 mm border off all round. A rounded rectangle's Corner radius grows with the artwork when its size changes; offsets don't.
Contour#
The outline is traced from the artwork, then smoothed and set out by the cut offset, with round corners.
- Trace
- Transparency traces a PNG, TIFF or WebP with a transparent background. Background colour traces artwork on a plain background (white, or the colour you pick) within the Tolerance: raise it when a shadow or noise around the artwork is left inside the cut, lower it when pale parts of the artwork are cut away. Automatic uses the transparency when the image has some, else the colour it finds at the edges.
- Cut offset
- How far outside the artwork the cut runs. 1/16 in (1.6 mm) is a tight kiss cut; 1/8 in (3.2 mm) leaves a white border that hides small cutting errors. It starts at 4.5 pt (about 1.6 mm).
- Smallest detail and Smallest hole
- Specks smaller than the smallest detail are left out and gaps narrower than it are filled, so the blade never has to follow a spike; holes smaller than the smallest hole are filled.
- Keep holes
- Off (the default), only the outer contour is cut. On, holes in the artwork larger than the smallest hole are cut out too, like the inside of a letter O.
- Separate pieces
- Artwork in several pieces is made one piece: Join with bridges (straight strips as wide as the Bridge width) or One outline around all. Largest piece only makes the largest piece the die and leaves the others out (a warning says how many): a job cuts each item as one piece, so a second outline would be printed but never cut.
The section says what was traced ("Traced from the transparency", how many specks were left out). A contour is traced again from the new artwork whenever the size changes or a new version of the file arrives.
| Setting | API field | Default | What it does |
|---|---|---|---|
| Trace | `source` | auto | auto, alpha (the transparency) or color (a background colour). |
| Background | `key_color` | null | The background colour as [r, g, b] (0 to 255); null finds it at the edges. |
| Tolerance | `tolerance` | 0.1 | How far from the background colour still counts as background: 0.005 to 0.9. |
| Cut offset | `offset_pt` | 4.5 | How far outside the artwork the cut runs: -36 to 72 pt. |
| Smallest detail | `min_feature_pt` | 3 | Specks and gaps smaller than this are dropped or filled: 0 to 72 pt. |
| Smallest hole | `min_hole_pt` | 6 | Holes smaller than this are filled: 0 to 144 pt. |
| Simplify (API) | `simplify_pt` | 0.5 | How far the traced outline may move to drop points: 0 to 10 pt. |
| Smoothing (API) | `smooth` | 2 | Rounds of corner smoothing: 0 to 5. |
| Keep holes | `keep_holes` | false | false cuts the outer contour only. |
| Separate pieces | `single_piece` | bridge | bridge (join with bridges), hull (one outline around all) or none (the largest piece only). |
| Bridge width | `bridge_pt` | 9 | The width of the bridges: 1 to 72 pt. |
| Trace resolution (API) | `ppi` | 150 | Pixels per inch the artwork is traced at: 36 to 600. |
| Trace area (API) | `clip` | trim | trim (inside the trim box) or page (the whole page). |
Drawn#
Press Draw and click on the page to add points; the status bar says what to do next. Click the first point, or press Enter, to close the outline. With Snap to the trim box on, points near a trim edge land on it. After that, drag a point to move it, and Backspace deletes the point you last touched. Smooth rounds the corners, Straighten turns nearly straight runs into straight lines, Clear starts again. An outline that crosses itself is refused, and Show where zooms to the crossing.
Folds and extra cuts#
Draw crease and Draw cut line add open lines: click their points on the page and press Enter (or Done) to finish. Each line in the list can be switched between Crease and Cut, edited or deleted. The lines are part of the die you create, so press Update die after changing them. Creases fold the carton in 3D (see The 3D carton).
Its ink in the print-ready file#
The created die is mapped to Cut and its creases to Crease (see Inks and line types), and it is written into the print-ready file as a 0.25 pt line set to overprint, on a layer of its own called Dieline (creases on a Crease layer), after the bleed. Its spot colour is the Die ink:
| Die ink | Why |
|---|---|
| Dieline | The default: a spot most cutting tables and RIPs can map. |
| CutContour | The spot name most print-and-cut RIPs look for. |
| Thru-cut | A usual name on flatbed cutting tables for a cut right through the material. |
You can type another name your cutter reads. The editor offers the name your team used last first. A PDF/X-1a or PDF/X-3 file doesn't allow layers, so there the line becomes part of the page, and the Bleed tab says so. Creating or changing the die makes an existing print-ready file Out of date (see Bleed and the print-ready file); a die alone is enough to Apply to print-ready file on the Tools tab.
Using another die, and removing it#
The Created button at the top of the tab makes the created die the die again after you chose Cut lines, Trim box or ticked other paths; the created die is kept meanwhile. Remove takes it away with its lines.
New versions of the file get the created die with the rest of the settings and trace it again (see Files and images). A contour that follows the new artwork doesn't count as a changed cut path.
The same tools are in the API: see Prepress API.