

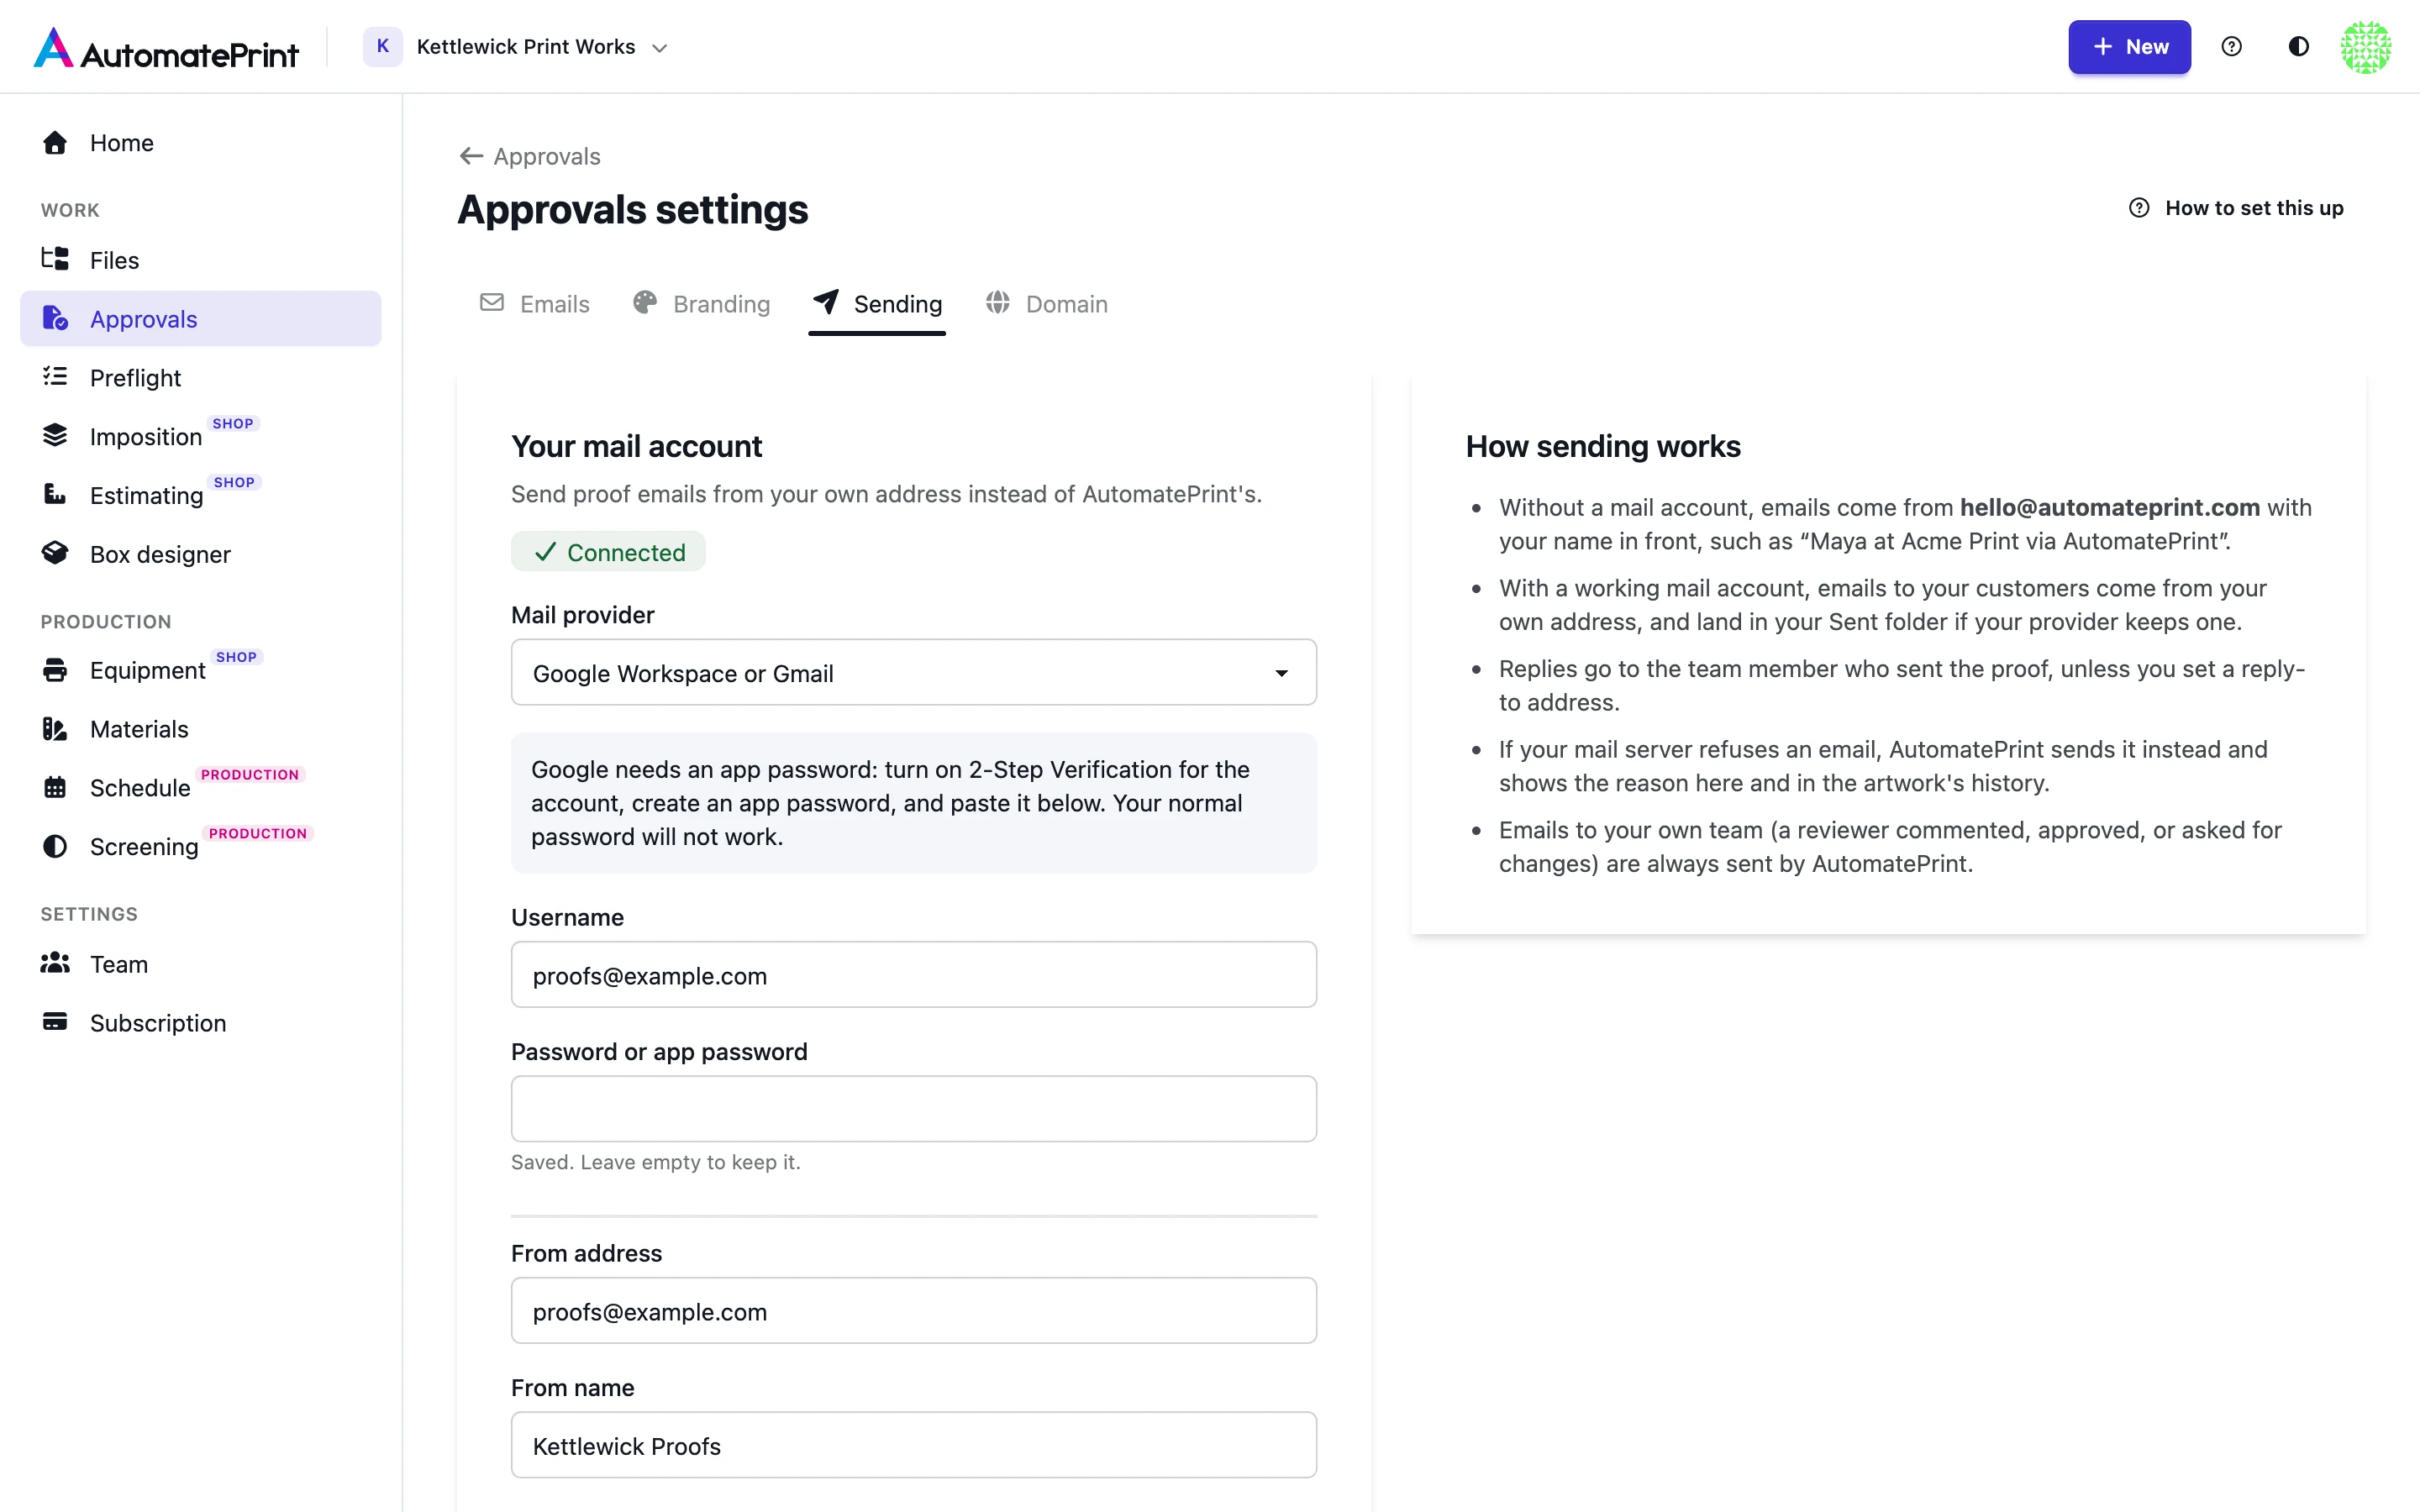
Out of the box, proof emails are sent by AutomatePrint with your name in front, such as "Maya at Acme Print via AutomatePrint". Connect your own mail account and the emails to your customers come from your address instead, the way an email you wrote yourself would. If you would rather not connect a mailbox, add a few DNS records to your domain and AutomatePrint sends the emails as your domain: see Send proof emails from your own address. Team administrators set either up under Approvals → Settings → Sending. Open Approvals
Before you start#
Use a mailbox your whole team is happy to send from, such as proofs@example.com, not one person's own mailbox:
every proof email to a customer goes out through it. You need to be able to sign in to that mailbox's security
settings, or have your mail administrator at hand. For your own domain without a mailbox you need access to the
domain's DNS settings instead.
| Mail provider | Server and sign-in |
|---|---|
| Google Workspace or Gmail | smtp.gmail.com, port 587. Needs 2-Step Verification on the account and an app password; the account's normal password is refused. |
| Microsoft 365 or Outlook | smtp.office365.com, port 587. Needs Authenticated SMTP allowed for the mailbox by an administrator, and an app password when the account uses multi-factor authentication. |
| Other mail server | Any SMTP server reachable on the internet: you enter its name, port (587, 465, 2525 or 25) and encryption. |
| Your own domain (DNS records, no mailbox) | No server and no sign-in. You add four DNS records to your domain, and AutomatePrint sends the emails signed as your domain. |
Google Workspace or Gmail#
Google does not accept the account's normal password from other apps. It needs an app password: a 16-character password made for one app.
- Sign in to the Google account you want to send from and open Manage your Google Account → Security.
- Turn on 2-Step Verification if it is off. App passwords do not exist without it. In a Workspace, your administrator has to allow 2-Step Verification for users first.
- Search the account settings for App passwords, create one named "AutomatePrint", and copy the 16 characters.
- In AutomatePrint, choose Google Workspace or Gmail as the Mail provider.
- Username: the full email address of the account. Password or app password: paste the app password.
- From address: the same address, or an alias you added to that account under Gmail's Send mail as.
- Fill in From name, then go to Send proof emails from your own address.
If Google shows no App passwords page, the account signs in with security keys only, is in the Advanced Protection programme, or your Workspace administrator has switched app passwords off.
Microsoft 365 or Outlook#
Microsoft needs two things: SMTP sign-in allowed for the mailbox, and the right password. This works for work and school mailboxes in Microsoft 365. Personal Outlook.com, Hotmail and Live accounts cannot be connected: Microsoft no longer accepts a password from other apps for them.
- Ask your Microsoft 365 administrator to allow Authenticated SMTP for the mailbox: in the Microsoft 365 admin centre, Users → Active users → the mailbox → Mail → Manage email apps → tick Authenticated SMTP.
- If the account uses multi-factor authentication, create an app password in the account's Security info and use that. Without multi-factor authentication, use the account's password.
- In AutomatePrint, choose Microsoft 365 or Outlook as the Mail provider.
- Username: the full email address. Password or app password: the password from step 2.
- From address: the mailbox's own address. Microsoft refuses any other address unless the mailbox has "Send as" rights for it.
- Fill in From name, then go to Send proof emails from your own address.
Warning: Microsoft is turning password sign-in for SMTP off
Microsoft is phasing out signing in to SMTP with a password and switches it off by default. Your administrator can allow it again for your organisation. If your organisation does not allow it, send as your own domain with DNS records (Send proof emails from your own address), which needs no sign-in at all, or from another mail service using Other mail server, or keep letting AutomatePrint send in your name.
Any other mail server#
Choose Other mail server for any service that offers SMTP, including transactional mail services.
- SMTP server: the server name from your provider, such as
smtp.example.com. - Port and Encryption: use port 587 with STARTTLS, or port 465 with SSL/TLS. Ports 2525 and 25 are also accepted. The connection is always encrypted.
- Username and Password or app password: the SMTP sign-in from your provider.
- From address: an address that account may send as.
The server has to be reachable on the public internet. A server inside your own office network cannot be used.
Your own domain, without a mailbox#
Choose Your own domain (DNS records, no mailbox) when you do not want to hand over a mailbox password, or your mail provider does not allow one. You add four records to your domain's DNS. They prove the domain is yours and let AutomatePrint sign your customer emails as your domain, so they arrive from your address.
- Choose Your own domain (DNS records, no mailbox) as the Mail provider.
- From address: any address at your domain, such as
proofs@example.com. It does not have to be a mailbox. - Reply-to address: a mailbox you read, if the From address is not one. Left empty, replies go to the team member who sent the proof.
- Fill in From name and choose Save. The status becomes Waiting for DNS and the page shows four records.
- Sign in where your domain's DNS is managed and add all four, copied from the page: three
CNAMErecords and oneTXTrecord. Many DNS providers add your domain to a record's name themselves; there, enter only the part of the name before your domain. If a record offers a proxy (an "orange cloud"), switch it off. - Back on the Sending tab, choose Check DNS now.
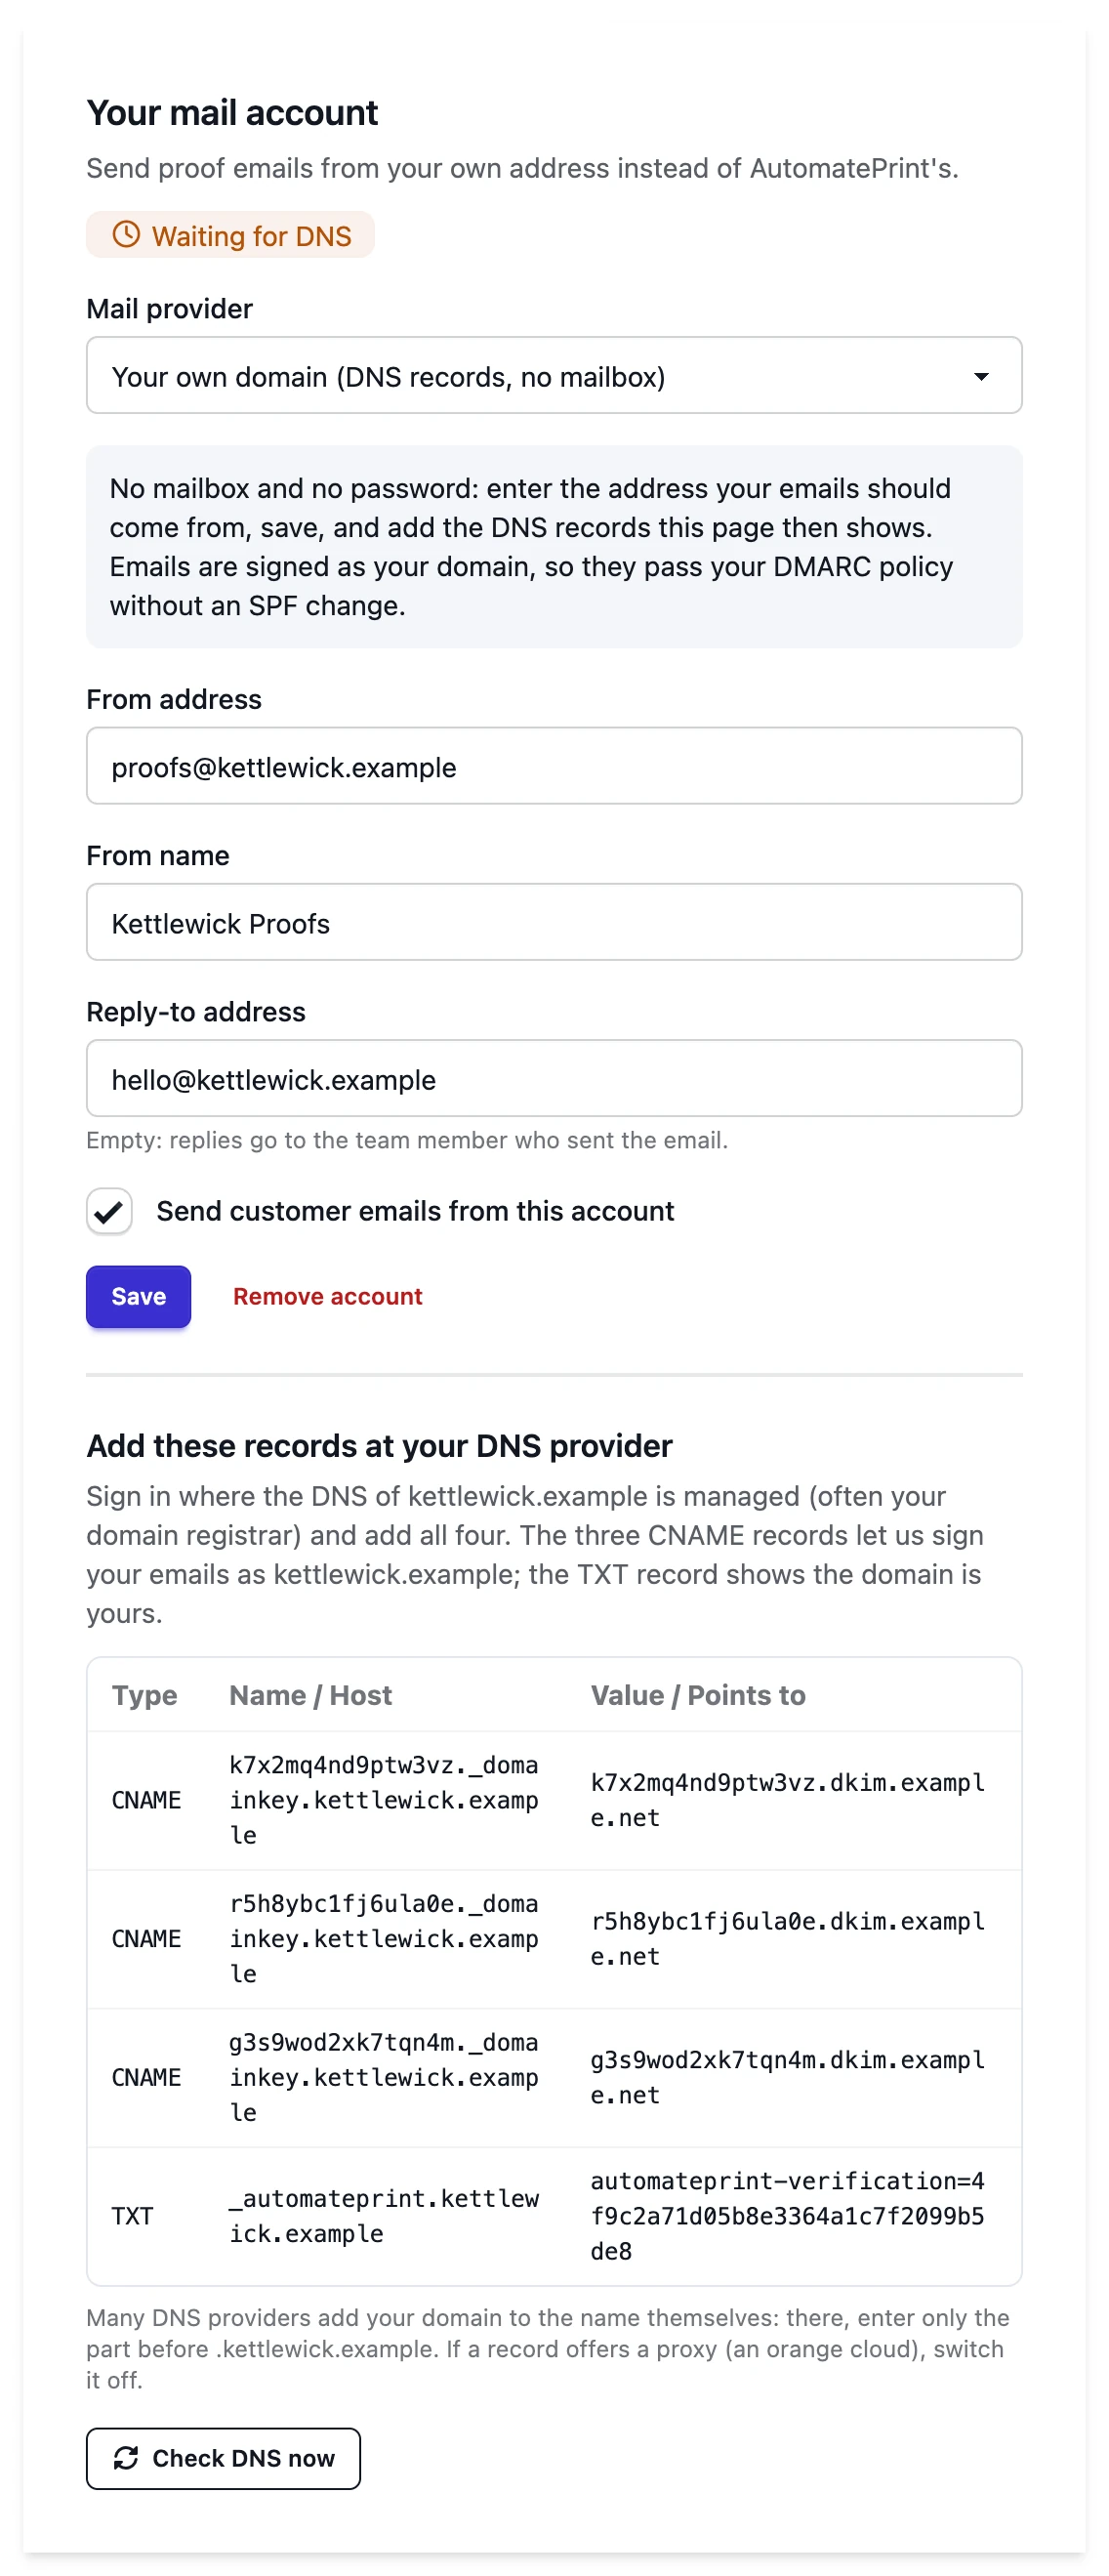
The TXT record usually shows within minutes. The CNAME records usually show within an hour and can take up to
three days; until then the page says which records are still missing. AutomatePrint also checks by itself once a
day, so the domain connects even if you do not come back.
When all four are found, the status becomes Connected and a test email is sent from your new address to your own. From then on emails to your customers come from that address.
To test again at any time, type an address under Send a test to below the records and choose Send a test email. Open it in the inbox and confirm the sender is the name and address you expect. To see a real proof email instead of the short test, use Send test on any email under Emails: see Emails and branding.
- You do not need to change your SPF record. The emails are signed as your domain (DKIM), which is what a receiving mail server's DMARC check looks for. Leave your existing SPF and DMARC records as they are.
- Another address at the same domain needs no new records: change the From address and save. A different domain starts over with four new records.
- Keep all four records. If one is removed, the daily check notices. After three missed checks, emails are sent by AutomatePrint in your name again until the record is back and you choose Check DNS now.
- A domain belongs to one team. A domain another AutomatePrint team has connected cannot be connected again.
- There is no Sent folder, because there is no mailbox. The artwork's history lists every email instead: see History and notifications. Emails sent this way read from your mail account there, as with a mailbox.
Test and switch on#
This section is about mail accounts. Your own domain is tested when its records are found and whenever you choose Send a test email there, as described above.
- Send the test to is filled with your own address. Change it to any inbox you can check.
- Choose Save and send a test. AutomatePrint signs in to your mail server and sends one short message.
- When the page says It works and shows Connected, emails to your customers go out from your account from then on. Look at the test in the inbox and confirm the sender is the name and address you expect.
If the test fails, your settings are saved but the account is not used, and the page shows the mail server's reason: usually the username or password, or a From address the account may not send as. Correct it and send the test again. Changing the server, port, username, password or From address always asks for a new test.
To see a real proof email rather than the short test, use Send test on any email under Emails: see Emails and branding.
How emails are sent once connected#
- From: your From name and From address. With no From name, it is the sender and your company, such as "Maya at Acme Print".
- Replies go to the team member who sent the proof. Set a Reply-to address to collect all replies in one mailbox instead.
- Emails to your own team (a reviewer commented, approved or asked for changes) are still sent by AutomatePrint: they never use your account.
- Send customer emails from this account switches the account off without deleting it.
When your mail server refuses an email#
A reviewer should never miss a proof because of a mail setting. If your server refuses an email (an expired app password, a mailbox over quota), AutomatePrint sends that email itself in your name. The Sending tab then shows Last email failed with the server's reason, and the artwork's history says which email went out that way and why: see History and notifications. The next email your server accepts clears the warning.
Your password#
The password is stored encrypted, is never shown again and never leaves AutomatePrint except to sign in to your mail server. Leave the field empty when you change other settings to keep the saved one. Remove account deletes it together with the other settings.