

Bleed is artwork that runs past the cut line, so a cut slightly off never leaves a white edge. Many files arrive with too little bleed, or with bleed around a rectangle when the piece is shaped. The Bleed tab adds bleed that follows the die, whatever its shape, and makes a print-ready file with it. The file you uploaded never changes.
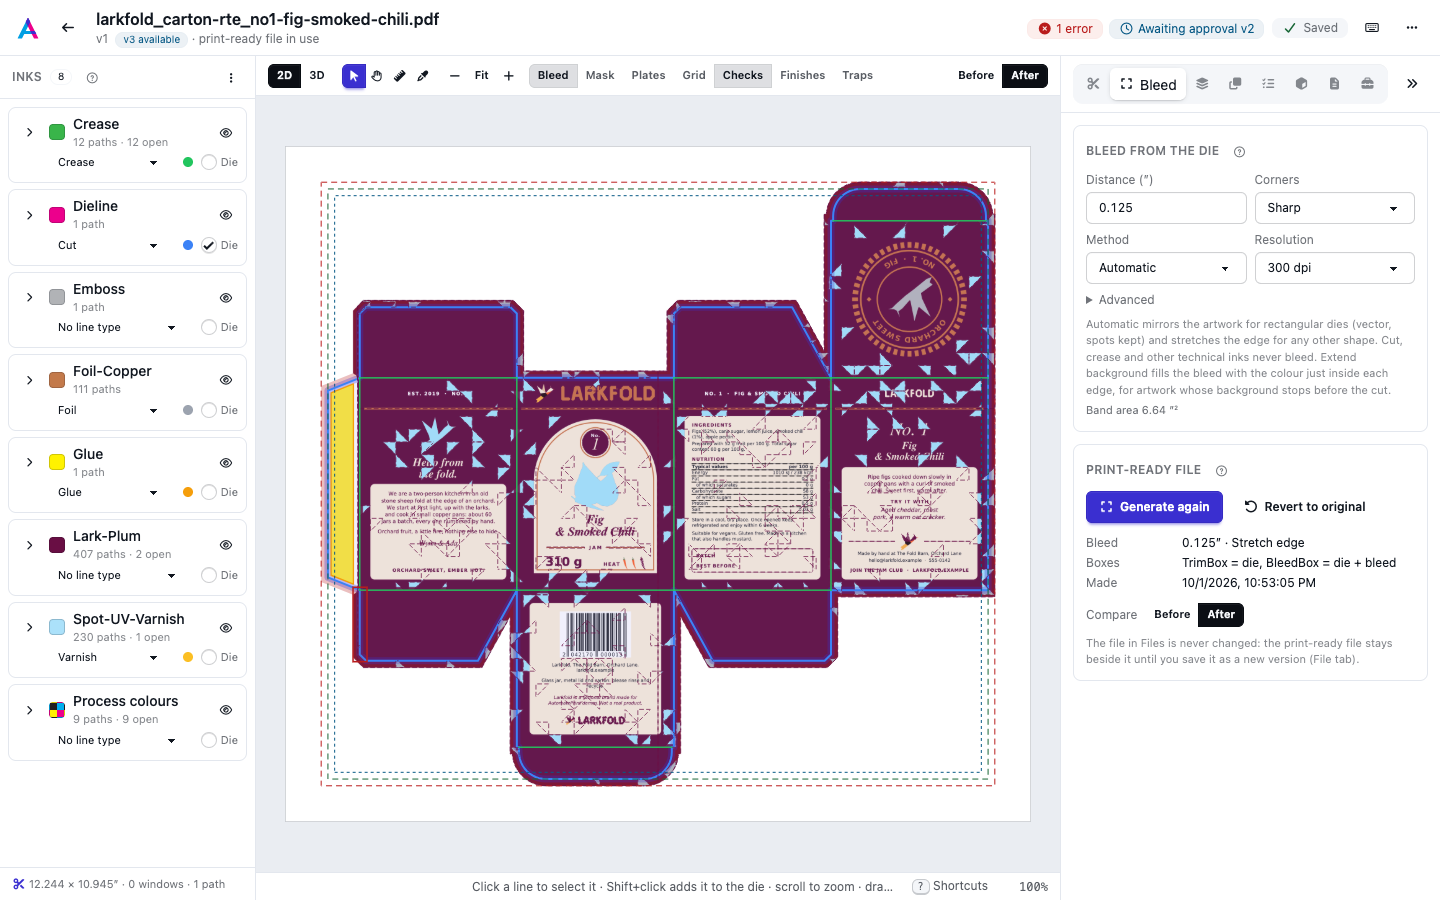
The settings#
Settings save on their own, and the page shows the new bleed band and the page boxes as you type, while the Bleed view is on (it is on by default; Bleed in the toolbar or B switches it). Lengths use the job's unit.
- Distance
- How far the bleed reaches past the die. It starts at 9 pt (1/8 in, about 3.2 mm) and can be up to 144 pt (2 in).
- Corners
- How the band turns the die's outer corners: Sharp (a mitred point), Round or Flat (cut off).
- Method
- How the band is filled, below.
- Resolution
- 150, 300 (the default) or 600 dpi, for the parts of the band that are rendered as an image.
- Sample inside the die (under Advanced)
- Where the artwork is sampled from, measured in from the die. Leave it empty to sample just past the die line, so the line itself never bleeds. Up to 72 pt (1 in).
If the file already declares bleed (its BleedBox is bigger than its TrimBox), the tab says how much. Generating replaces it with bleed from the die.
Methods#
| Method | What it does |
|---|---|
| Automatic | Mirror for rectangular dies, Stretch edge for any other shape. |
| Mirror | The artwork is reflected across the die edge. For a rectangular die this stays vector, with spot colours kept; for other shapes it is rendered at the resolution. |
| Stretch edge | Each point of the band repeats the artwork just inside the nearest die edge, rendered at the resolution. |
| Extend background | Each side of the die (and each sharp corner) is filled with one flat colour: the most common colour in a strip just inside that edge. For images and files from Files whose background stops before the cut, where mirroring would copy the artwork into the bleed. Rendered at the resolution. |
Cut, crease, glue and the other technical inks never reach the band (see Inks and line types). The band goes on its own Bleed layer of the PDF, under the artwork. PDF/X-1a and PDF/X-3 files don't allow layers, so there the band becomes part of the page, and the tab says so. Where opaque page content covers the bleed area, the band is drawn over it, outside the die only, and the tab says so too.
Generate the print-ready file#
Press Generate bleed (Generate again later). You need a die first: bleed follows its outline, so use the trim box as the die for flat work (see The die).
The print-ready file gets:
- the bleed band;
- TrimBox set to the die's box and BleedBox to the die's box plus the distance;
- a bigger page when the bleed runs past the page edge;
- the output tools of the Tools tab: spot renames and overprint of technical inks (see The Tools tab).
Generating also sets the artwork's nest bleed to the distance, so the job keeps room for it.
A small band is made while you wait. A large one (a big piece at a high resolution) is made in the background: the tab shows Waiting for a worker…, then Generating bleed…, and the file updates when it is done. If a background job can't start or takes too long, Generate here makes it while you wait, when it is small enough. A band that is too large to make at all is refused: lower the resolution, the distance or the sampling inset.
When trapping is on for this artwork, the new file is trapped again (see Trapping).
What was made#
After generating, the tab lists the Bleed (distance and the method used), the Boxes, whether the Page was enlarged, and when the file was Made, with any warnings. Compare switches the page between Before (the file as supplied) and After (the print-ready file); the toolbar has the same switch.
From now on the job uses the print-ready file: the nest, the imposed PDF, downloads (Download print-ready file in the header's ⋯ menu) and proofs you share. The header says print-ready file in use.
Keeping the file up to date#
The print-ready file records what it was made from: the original file and page, the die, the bleed settings, the spot renames, the technical inks and the output tools. When any of these changes, the header shows Out of date and the tab says "Generate again so the job uses them". Until you do, the job keeps using the file as it was made.
Revert to the original#
Revert to original removes the print-ready file after you confirm. The artwork uses the file as supplied again, its nest bleed goes back to what it was before you first generated bleed, and its traps are forgotten. A bleed still being made is dropped.
The same settings are in the API: see Prepress API.